Azure static website with a HTTPS enabled custom domain

As example project I'll create a static website called sunshine, just for convenience a recognizable word. I want this website to be hosted in Azure and it should be accessible by a secure connection at my custom-domain.
In the following steps I explain what tasks needs to be done to get up and running with your website and custom-domain sunshine.ralfderijcke.nl. I use Azure CLI commands to complete most of the tasks. Here we go!
Prerequisites
Custom domain
As you probably guessed, you need a custom domain. One requirement is that you need to have the possibility to add CNAME records.
Azure subscription
There is an Azure subscription required to create and manage azure resources.
Azure Command-Line Interface (CLI)
During this blog I will use the Azure Command-Line Interface (CLI) for creating and managing the Azure resources. The installation and use of the CLI is described on the Azure Command-Line Interface (CLI) documentation page.
Resource group
First step is to create an Azure resource group for logical grouping of our created resources.
az group create --name rg-sunshine-demo --location westeurope
If you have difficulties reading my naming convention; I'll use Microsoft's Recommended naming and tagging conventions.
Storage account
For hosting the static website, a storage account is required. The az storage account create command creates a new storage account. Dashes (-) are not allowed in storage account names. I set the sku to Standard_LRS (Locally Redundant Storage). All sku type names are case-sensitive.
az storage account create --name stsunshinedemo --resource-group rg-sunshine-demo --location westeurope --sku Standard_LRS
More info on storage account creation can be found on the Manage storage accounts documentation page.
Static website
Use the command below to update our storage blob service by enabling the static-website feature with --static-website true and define the index document with --index-document index.html.
az storage blob service-properties update --account-name stsunshinedemo --static-website true --index-document index.html
Content
Next we need to have something to put in our storage. For this I created a super advanced website with..., no, just an index.html file like below in a directory called sunshine. It can be almost anything (html, css, js, media files, etc).
<!doctype html>

<html lang="en">
  <head>
    <meta charset="utf-8">
    <title>Sunshine</title>
  </head>

  <body>
    <h1>Sunshine</h1>
    <p>I guess it must be Solar powered?</p>
  </body>
</html>
Upload the directory contents with the following command. Here we use the directory ./sunshine as source and our storage container $web as destination.
az storage blob upload-batch --account-name stsunshinedemo --source ./sunshine --destination $web
To test our website we need to known the primary web endpoint. In simple words, we need the url of our website. This can be done by querying the az storage account as shown here.
az storage account show --name stsunshinedemo --query primaryEndpoints.web
The query returns something like "https://stsunshinedemo.z6.web.core.windows.net/". Now open the primary web endpoint in your favorite browser. The website (index.html) is shown.
Content delivery network
Stay awake, we're halfway there. We need to deliver our content to the client. This is done by adding a content delivery network (CDN) profile to the Azure CDN. In that profile we add an endpoint with your custom-domain configured.
Profile
Create the CDN profile by using the command below where I use --sku Standard_Microsoft as my CDN provider.
az cdn profile create --name cdnp-sunshine-demo --resource-group rg-sunshine-demo --location westeurope --sku Standard_Microsoft
Endpoint
Next is the endpoint. As --origin and --origin-host-header we use the earlier queried primary web endpoint domain name as shown below. It's the domain name only, without the https:// prefix.
az cdn endpoint create --name cdne-sunshine-demo --resource-group rg-sunshine-demo --profile-name cdnp-sunshine-demo --origin stsunshinedemo.z6.web.core.windows.net --origin-host-header stsunshinedemo.z6.web.core.windows.net
Domain name registrar
It's time to let your domain name registrar known what domain name needs to point where.
CNAME
We need the hostname of the CDN endpoint. Query the hostname with the az cdn endpoint show command.
az cdn endpoint show --name cdne-sunshine-demo --profile-name cdnp-sunshine-demo --resource-group rg-sunshine-demo --query hostName
The query returns something like "cdne-sunshine-demo.azureedge.net". Add a CNAME record for your domain at your domain name registrar. For this example I create a (sub-)domain called sunshine as shown in the image below.

Custom-domain
To connect your CDN endpoint to the custom hostname you've just created you need a DNS mapping. Do this by creating a custom-domain with a DNS mapping from the custom hostname to the CDN endpoint hostname.
az cdn custom-domain create --name cd-sunshine-demo --endpoint-name cdne-sunshine-demo --profile-name cdnp-sunshine-demo --hostname sunshine.ralfderijcke.nl --resource-group rg-sunshine-demo --location westeurope
Https
To enable secure communication between the client and our storage account you need to enable HTTPS. Use az cdn custom-domain enable-https with --min-tls-version 1.2 to support Transport Layer Security (TLS) version 1.2.
Use the command below to enable HTTPS. The command will finish in a few seconds. In the background it will complete much more tasks and can take a few hours to complete the whole process.
az cdn custom-domain enable-https --min-tls-version 1.2 --endpoint-name cdne-sunshine-demo --name cd-sunshine-demo --profile-name cdnp-sunshine-demo --resource-group rg-sunshine-demo
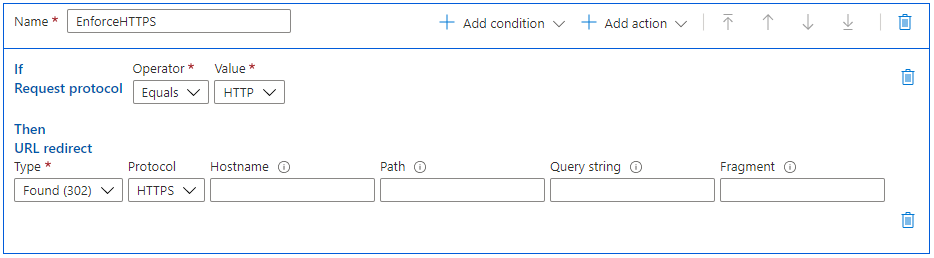
Redirect Http to Https
To complete everything there's one last task to take. We need to enforce the use of https to prevent http access. This can be done in the azure portal by adding a rule to the Rule engine. This can be found under the cdne-sunshine-demo endpoint settings by selecting the Rule engine option. The add the rule as shown below and don't forget to Save.
Now we have created a static website that is hosted in Azure and is accessible by a secure connection at your custom-domain address.